Working with external data: the File Parameter dialogue
The File Parameter dialogue allows the modeller to specify where every parameter in the model gets its values from. It contains an entry box for each parameter, which displays the values associated with it, and when you hover over it it pops up information about where those values come from. Hovering over the parameter captions, listed to the left of the entry fields, displays the units and dimensions of the required data. Simple values can be typed in directly, while long lists can be loaded from data files.
Entering the dialogue
The dialogue will be displayed whenever running a model which is missing some parameter values.
In Simile v7, the same information is present in the Parameters tab in the explorer pane of the model run environment, and parameters can be altered there. In earlier versions, the dialogue can be displayed again for the purpose of altering parameter values, by hitting the  properties button in the toolbar of the model run environment.
Using the dialogue
The dialogue divides the parameters up into their submodel levels, and includes buttons at each level to the right of the submodel name. The outermost level is titled 'TOP LEVEL' and the buttons to the right of this heading affect all the values in the model. The same set of buttons appears for each submodel level, where they affect only the parameter values inside that submodel.These buttons do the following:
- Clear all values from that submodel's parameters
- Load values from a scenario file
- Create a scenario file containing these values
Note that if you create a scenario file for a submodel, the parameters in that submodel will be referenced in the file relative to that submodel level, not the whole model. So a file saved for a submodel cannot be loaded at the top level, or vice versa. However, a scenario file saved for one submodel can be loaded into another if they have the same internal layout of file parameters.
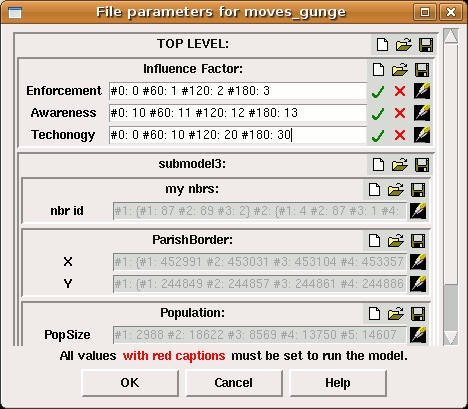
Inside the submodel boxes, there is a line for each fixed or variable parameter in that submodel. The line has an entry field into which single values, small arrays and time series can be typed, and buttons to the right. The 'tick' and 'cross' symbols finish and restart editing respectively. The 'pencil' symbol only appears for array or time series parameters, and opens the table entry dialogue for that parameter. If the table entry dialogue has already been used to enter a large data set for a parameter, the entry box will be greyed out and the tick and cross buttons will no appear -- the only way to edit the data set is to reopen the table entry dialogue.
The file parameter dialogue is displayed when you first run a model that contains fixed parameters. It can be displayed again by selecting the "Parameters..." menu item, which is in the file menu on the single-window model run environment, or under the "I/O Tools" menu on the model window if using the multiple-window model run environment.
Comments on parameter values
It is possible to add a comment to a particular parameter value or array of values. Such a comment applies to the value itself rather than the parameter which takes that value. Use it for noting how the value was derived, e.g., from what publication it came. The comment will be popped up when you hover over the value field, along with the actual file reference. These comments will be saved with the references in the scenario files.
To edit a value's comment, double-click on its entry field. There is also a text box for editing a value's comments in the table data dialogue.
In: Contents >> Working with external data
File Parameter dialogue : Entering values directly
The simplest way to set a file parameter is to type its value straight into the entry box beside its caption in the file parameter dialogue. For single values, this is the only way to enter them initially. The tick button replaces the currently saved value with what has been typed in, while the cross button reverts the entry field to the saved value.
The datatype (e.g., INTEGER or REAL) is displayed by hovering over the caption to the left. This will also display any comment associated with the parameter. If multiple values are required, the dimensions will also be displayed at this point, e.g., 3 x 3 of REAL). If there are multiple values, you get the pencil icon to the right of the entry field, which normally you would use to load them from a file. However, you can choose to type them in.
In Simile v7, arrays and lists are entered in the JSON format. In this format, an array is an ordered list of its members, separated by commas, enclosed in square brackets. Thus a 5-element array of real could be [2.5,3.5,1.5,2.5,3.5], while a 3x3-element array of integer might be: [[5,10,15],[6,7,9],[4,1,8]]. A list is a list of pairs of index and value, with a colon between the index and value, and the pairs separated by commas, enclosed in curly brackets. Thus a time series with integer values applying at times 10, 50 and 100 could be written: {10:33, 50:45, 100:78}. An array can also be written as a list, with the integers from 1 to its size as the indices. The index-value pairs in a list do not need to be in any particular order. The older format described below also works, for the sake of backward compatibility.
In earlier versions, when typing in multiple values, you must alternate between indices and values at each level, and group sub-arrays in curly brackets. So for instance a five-element array of real could be: 1 2.5 2 3.5 3 1.5 4 2.5 5 3.5, while a 3x3-element array of integer might be: 1 {1 5 2 10 3 15} 2 {1 6 2 7 3 9} 3 {1 4 2 1 3 8}.
If redisplaying the file parameter dialogue in an earlier version, the values will be shown with hashes and colons around the indices, to make the data more readable. For instance the five-element array above would look like this: #1: 2.5 #2: 3.5 #3: 1.5 #4: 2.5 #5: 3.5. You must keep these if editing the entry field to change the value, but at this point you can also go to the table data dialogue and edit the values in a version of the table helper. If the values have previously been loaded from a datafile and there are very many of them, the entry field will be greyed out so you cannot type into it, and will also contain an ellipsis rather than listing all the values. In this case they can only be changed via the table entry dialogue.
In: Contents >> Working with external data >> The file parameter dialogue
Working with external data : Specifying time series
The File Parameters dialogue will contain entry fields for both fixed and variable parameters. Fixed parameters must be given a value; their captions in the dialogue will be shown in red until a correctly formatted value has been supplied. Variable parameters do not need a value, and can be left empty, so the value can be set by a slider while running the model. However, it is possible to enter a time series in the File Parameters dialogue, which will cause the variable parameter's value to be set at a series of specified time points while the model is running. You would normally set up the time series using the table data dialogue, but the direct method is described here to clarify the analogy with setting values for an array.
Entry format
The format for entering a time series is the same as for a one-dimensional array, except time points are given instead of indices. The time points can be REAL values, and do not have to be at regular intervals. Data for time point zero is loaded whenever the model is reset. So, to set a value five times between time 0 and time 100, the entry might look like this: 0 12 20 11 40 8 60 7 80 9
If the value to be set is an array, the data must specify a multi-dimensional array, with the time points as the outermost indices.
Special indices and values
The data for a time series can include various combinations of special index and value, which affect how the numerical data is interpreted:
- Data at time point NOW is loaded into the model as soon as the File Parameters dialogue is closed, and then not used again. Wiggling a slider effectively sets data at time point NOW.
- For time point OTHERS, you do not enter a value; instead, you enter one of the special values use_last, use_closest or interpolate. These select the different methods for getting a value when the time is not exactly equal to one of the indices in the series. use_last specifies the default behaviour; each value stays in the model until the next time point is reached. use_closest causes the value to change midway between the two specified time points, while interpolate means the value changes continuously and linearly between one specified time point and the next.
- The INTERVAL time point allows you to supply a time unit which applies to the other indices. This can be useful if you have files containing time series data with the times specified in different units. For instance, if the supply the following data for a time series: 1 3.2 2 4.5 3 6.3 INTERVAL week ...then unless the time unit for model execution is set to something other than day, the variable will change value at times 7, 14 and 21. The time unit can be anything that Simile understands, e.g., ms.
- The special value default effectively cancels the last time point. It has a normal numerical time point as its index, and after the default point the value of the parameter goes back to what it would have been without the time series, i.e., the value from the component's equation, or the value from the base case if the time series applies to an experimental case. Numerical time point values after the default point will cause the parameter to start getting values from the series again when they apply.
- There is also another special value, restart, which has a normal numerical time point as its index; this specifies a time at which the model starts reusing values at the beginning of the time series, starting with time 0. The value will then follow a regular pattern, whose period is the time index of the restart value. The time for restart must be the last in the sequence.
Example: rough approximation of sinusoidal variation with period 100 time units:
0 0 12.5 0.7 25 1 37.5 0.7 62.5 -0.7 75 -1 87.5 -0.7 OTHERS interpolate 100 restart
When entering time series values in the table data dialogue, there are special buttons to get these behaviours by setting the special indices and values.
In: Contents >> Working with external data >> The file parameter dialogue
Working with external data : Referencing data in files
Ther normal way to use the file parameter system is to create and save references to data in other files. To do this, click the 'pencil' icon to the right of the data entry field. This brings up the table data dialogue, which allows you to specify the file containing the data, and how to get the data from the file.
Once this has been done, hovering over the entry field will produce a popup showing which file contains the actual data. Hitting the 'pencil' button again will show the reference information and allow it to be altered.
In: Contents >> Working with external data >> The file parameter dialogue
Working with external data : Loading and saving scenario files
Once you have specified the data for all the file parameters, you can save that data in a scenario file (extension .spf, sometimes referred to as a parameter metafile). This file does not necessarily contain the actual data, it can contain references to the files that actually contain the data. It is in an XML format, allowing it to be examined and edited if required.
The normal way to save the scenario file is to click the 'diskette' button in the top-right corner of the file parameter dialogue, by the caption TOP LEVEL. This will create a file containing information for all the parameters in the model. You can save a scenario file for just the parameters in a submodel, by clicking on the 'diskette' button to the right of the caption for that submodel. This file will include the information for all submodels under that one in the hierarchy.
When the scenario file is saved, the locations of any data files referred to will be included as relative paths. This means that if you move the scenario file to a new location, for instance when copying the model and its data to another computer, the data files must be in the same location relative to the scenario file (e.g., in the same folder) as they were when it was set up.
To load a scenario file, click the 'open folder' button to the right of the submodel caption. This action will not load the data itself; that only happens when you click the 'tick' beside a parameter's entry field, or hit the 'OK' button at the bottom of the dialogue. If you have made separate scenario files for submodels, it is important that they are loaded into the same submodels for which they were saved, otherwise Simile will not be able to find the file parameter elements that they refer to, since it will be looking in the wrong submodel or at the wrong level. Loading a scenario file overwrites any information that was already present for the parameters mentioned in the file. This allows you to have one set of values for a submodel saved as part of a top-level scenario file, but still load different values just for that submodel from another scenario file.
In: Contents >> Working with external data >> The file parameter dialogue