Model diagram elements : Role arrow
 Role arrow
How to add a Role arrow
See Adding arrow-type elements.
Interpretation
Role arrows join submodels that participate in some form of association, or where one is a satellite of the other. The following sections detail the mathematical methods invoked by the role arrow. In each case, a multi-dimensional matrix is created containing instances of the submodel at the head of the role arrow. The dimensions of the matrix depend on the number of role arrows used, and the different uses are therefore described in separate sections.
Rules
- A role arrow can only be drawn between two submodels, one representing the object that plays a role in an association, and the other representing the association itself.
- Role arrows cannot be added in such a way that they form a loop.
In: Contents >> Graphical Modelling >> Object/agent based
Role arrow : Single role arrow
 Single role arrow
Using a single role arrow to connect two submodels is almost exactly equivalent to nesting one submodel inside the other. In effect, the submodel that the role arrow points to, is nested inside the submodel that the role arrow points from. This alternative diagram form is useful because of the extra flexibility it allows in laying out the model diagram. It is also helpful to understand this simple use of role arrows before using them in more complex ways.
The following model diagram illustrates the relevant features of the use of a single role arrow to connect two submodels. In this case, one submodel is called "Base" (or "Master"), and the role arrow points from it, to the other submodel, called "Satellite". "Base" is a multiple-instance submodel, with fixed dimensions. In the following example, there are ten instances of "Base". Inside "Base" there is a variable called "index". The equation for "index" is "index(1)". The variable "index" therefore has a unique value within each instance of "Base".
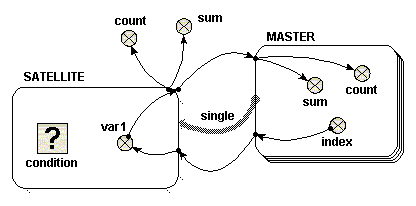
When adding the equations for this model, you will notice that the role arrow is having an effect on the parameter names corresponding to influences that come from inside a submodel at its far end. First, have a look at "var1" in the "Satellite" model. Now, if the role arrow were not present, the only available parameter name for this would be "[index]", representing an array of the values of "index" in the 10 instances of "Master". However, with the role arrow present, you can use the parameter name "single_index", made by combining the names of the role arrow and source component. This is a scalar quantity, and has the value of "index" in the particular instance of "Master" associated with each instance of "Sattelite". It is as if "Satellite" were a simple submodel inside "Master", with one instance for each instance of its parent. (Note, if using Simile v5.7 or later, the parameter name "[every_index]" is also available, which stands for the array of 10 values that you would get if the role arrow were not present. In versions 6 and on, the availability of the different interpretations of an influence can be enabled or disabled in the influence properties dialogue -- see Influences and Roles).
Something similar happens for influences going in the other direction from the role arrow. Now, look at "sum" in the "Master" model. The parameter name "{var1_single}" is available. The curly brackets indicate that this stands for a list of values -- but because the role arrow is used, the list will contain only the values from instances of "Satellite" associated with each particular instance of "Master". In this case, that means at most one instance, and hence one value, for each instance of the base model. (Again, if using Simile v5.7 or later, the parameter name "{every_var1}" is also available, which stands for the list containing values from all instances of the associated model).
Now let's look at what happens on execution. To start with, consider a case in which the  condition symbol in "Satellite" is omitted (or equivalently, where it has an equation whose value is always "true", such as 1>0). In this case, ten instances of "Satellite" are created, the same as the number of instances of "Base". Inside "Satellite" is a variable called "var1". There is an influence arrow from the variable "index" in "Base" to "var1", and its equation is simply "single_index". The value of "var1" in each instance of Satellite is therefore equal to the "index" of the equivalent instance of "Base".
To illustrate how "var1" is treated, there are four influence arrows taken from it. Two influence arrows point to variables "count" and "sum" within "Base" and two point to variables "count" and "sum" outside "Base". There is an important difference in the values received in these two circumstances, which is easy to understand if you consider "Satellite" is treated as if it were nested inside "Base".
- Inside "Base", the equation "count({var1_single})" returns 1, and "sum({var1_single})" returns a value equal to "index" of the same instance.
- Outside "Base", the equation "count({var1})" returns 10, and "sum({var1})" returns a value equal to sum of the index of all the instances, i.e. 55, in this case (calculated from 1+2+3+…+9+10)
Beware one point: both inside and outside "Base", the value returned from "Satellite" is received as a list, even if there is no condition symbol in the satellite. An integrating function such as sum() or count() must be used immediately on a list. Inside "Base", the list consists of a single number, so sum({var1_single}) returns the value of the number. The reason for using a list is that the list may in fact be empty, rather than containing a single value, for reasons described below. Note that curly braces are used to denote the list.
Now consider a simple equation for the condition symbol. In the example given, the condition symbol has no influence arrows pointing to it, though it can have. Suppose one wishes "Satellite" to exist for only the odd-numbered instances of "Base". In this case, the equation "fmod(index(1),2)==1" or "index(1)%2==1" would be used. Note that the index() function used within "Satellite" refers to the index of the equivalent instance of "Base".
Using the condition symbol in this or other ways permits the number of instances of "Satellite" to be less than the number of instances of "Base". There can never be more instances of "Satellite" however than instances of "Base", unless the satellite submodel has dimensions of its own.
In the example chosen above, in which only odd-numbered instances of "Satellite" are created, the four influence arrows behave like this.
- Inside "Base", the equation "count({var1_single})" returns either zero or one. It returns one, only if this is an odd-numbered instance, i.e. for instances 1, 3, 5, 7 and 9. Otherwise it returns zero. In these cases, i.e. instances, 2, 4, 6, 8 and 10, the list is an empty list. Similarly, the equation "sum({var_single})" returns either zero or a value equal to "index" of the same instance. It returns zero for each empty list, i.e. instances 2, 4 ,6, 8 and 10.
- Outside "Base", the equation "count({var1})" returns five. The equation "sum({var1})" returns 25 (calculated from 1+3+5+7+9).
When using the condition symbol in "Satellite", the use of the role arrow is more convenient than the equivalent nested arrangement. If "Satellite" were nested inside "Base" it would not be possible directly to receive the list in a variable outside "Base" -- you would instead get an array of lists.
Many satellite instances per base instance
In the above example, the satellite submodel does not have any dimensions of its own. It only has multiple instances because the base model does, and each base model instance can have at most one associated satellite submodel instance. But you can set dimensions for the satellite model, in which case each base model instance can be associated with up to this number of satellite model instances.
If you do this, then for equations inside the satellite submodel, index(1) means the index of that instance within the group associated with its base model instance, while index(2) means the index of the base model instance (as long as the satellite submodel has only one dimension).In other words, the value that is index(1) in a base model index is available as index(2) in its satellite model instances.
As an example, you could create a model where base instance 1 has 1 satellite instance, base instance 2 has 2, and so forth. The satellite would have dimensions 10 and the condition equation would be "index(1) <= index(2)". In the satellite, "var1" still has the index value of the corresponding base model. There would then be 1+2+...+10 == 55 satellite instances, and the value of "sum" outside the submodels would be 1*1 + 2*2 + ... + 10*10 = 385. Another example: set the condition equation to "index(1) >= index(2)". Now, base instance 1 will have 10 satellite instances, instance 2 has 9 and so forth. There are still 55 satellite instances, but "sum" is now 1*10 + 2*9 + ... + 10*1 = 220.
In : Contents >> Model diagram elements >> Role arrows
Role arrow : Two role arrows from different submodels
 Two role arrows from different submodels
If a single role arrow between two models can be compared to nesting one submodel inside the other, using two role arrows to link submodels both to a third can be compared to creating an area where the two submodels overlap and are interleaved with each other. From the point-of-view of "Object A", "Object B" is nested within "Object A". From the point-of-view of "Object B", "Object A" is nested within "Object B".
The following model diagram illustrates some of the features of this arrangement. Two multiple-instance submodels are created, "Object A" with two instances, and "Object B" with three. Both these objects are linked with role arrows to the third submodel "Association". One instance of "Association" is automatically created for each possible pair of instances of "Object A" and "Object B".
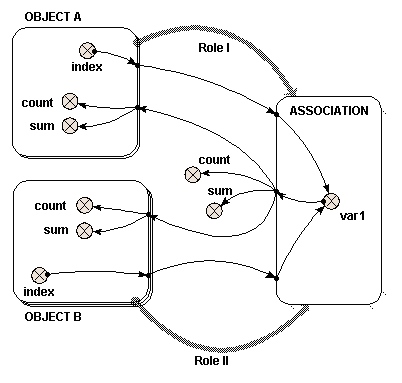
In this case, there are six instances of "Association", resulting from the two "Object A" and the three "Object B". Inside "Association" is a variable "var1". The two variables that influence "var1" have the full path names "../Object A/index" and "../Object B/index", and each has been set to the index of its own submodel with the equation "index(1)". The instance of "Object A" and the instance of "Object B" from which each "index" is taken is determined by the instance of "Association". Each instance of "Association" receives one of the six possible pairs of the "index" variables.
Local names for the two different full path names are created to avoid duplication, and to avoid using illegal characters such as spaces in the equation. In this case we have changed the local names to be "indexA" and "indexB" to avoid confusion, as described in the help page. In this simple example, the equation for "var1" is "indexA*indexB".
If this were represented by a table, it would look like this:
|
Object A - instance 1 indexA" = 1 |
Object A - instance 2 "indexA" = 2 |
|
|
Object B - instance 1 "indexB" = 1 |
Association - instance 1 "Var1" = 1 |
Association - instance 4 "Var1" = 2 |
|
Object B - instance 2 "indexB" = 2 |
Association - instance 2 "Var1" = 2 |
Association - instance 5 "Var1" = 4 |
|
Object B - instance 3 "indexB" = 3 |
Association - instance 3 "Var1" = 3 |
Association - instance 6 "Var1" = 6 |
The order of the instances in "Association" is determined by the order in which the role arrows are added. It is not usually important, but selecting "allow base instance lookup" in a role arrow's properties will ensure that "index(1)" in an equation in the association submodel refers to the indices of that arrow's base submodel. To understand how "var1" is represented, six influence arrows are taken from "var1" to different parts of the model.
- Inside "Object A"
|
{var1} |
count({var1}) |
sum({var1}) |
|
|
Instance 1 |
{1 2 3} |
3 | 6 |
|
Instance 2 |
{2 4 6} |
3 | 12 |
- Inside "Object B"
|
{var1} |
count({var1}) |
sum({var1}) |
|
|
Instance 1 |
{1 2} |
2 | 3 |
|
Instance 2 |
{2 4} |
2 | 6 |
|
Instance 3 |
{3 6} |
2 | 9 |
To understand where both these sets of results for "{var1}" come from, look down (for "Object A") or across (for "Object B") the relevant lines of the full six instance "Association" table given above. The count() and sum() functions operate on the given {var1} to produce the results shown.
- Outside both "Object A" and "Object B"
|
{var1} |
count({var1}) |
sum({var1}) |
|
|
{1 2 3 2 4 6} |
6 | 18 |
As with the use of a single role arrow, the  condition symbol will permit the number of instances of "Association" to be less than the product of the number of instances of "Object A" and "Object B". The Boolean expression used in the condition symbol can involve influences from other model elements and can use the index(x) function to return the instance of both "Object A" and "Object B", using x=1 and x=2 respectively.
In : Contents >> Model diagram elements >> Role arrows
Role arrow : Two role arrows from the same submodel
 Two role arrows from the same submodel
The most common use of the role arrow is (unfortunately) the most difficult to visualise. In this case, two different instances of the same object play two different roles in an association. One might think of this as being like each instance having all the other instances nested within it.
In the case of the single role arrow, or the case of two role arrows from two objects, the role itself was not an important element. The role arrow represented graphically the nesting arrangement. In this case however, the names of the two different role arrows are the only means of distinguishing the instances of the single object within the association submodel.
The following model diagram illustrates a simple example of the use of the association submodel in this way. There is an "Object" submodel, which has three instances. Two role arrows, "Role I" and "Role II", link "Object" to the "Association" submodel.
In this case, nine instances of "Association" are created, one for each possible pair of instances of "Object". Inside "Association" are two variables "var1" and "var2". Each of these receives a single influence arrow from the "index" variable in "Object", BUT, look at the list of parameters in the equation dialogue box, and two are given. These two parameters refer to the "index" variable in each of the members of the pair of instances of "Object" that generate this instance of "Association".
A unique local name for each parameter is automatically generated, but to avoid confusion, right click on each local name to rename it indexI and indexII, for "Value(s) of ../Object/index (from Object in Role I)" and "Value(s) of ../Object/index (from Object in Role II)" respectively. In this example, "var1" is given the expression "indexI" and "var2" is given the expression "indexII".
If this were represented as a table, it would look like this:
|
Object in Role I "indexI" = 1 |
Object in Role I "indexI" = 2 |
Object in Role I "indexI" = 3 |
|
|
Object in Role II "indexII" = 1 |
var1 = 1 var2 = 1 |
var1 = 2 var2 = 1 |
var1 = 3 var2 = 1 |
|
Object in Role II "indexII" = 2 |
var1 = 1 var2 = 2 |
var1 = 2 var2 = 2 |
var1 = 3 var2 = 2 |
|
Object in Role II "indexII" = 3 |
var1 = 1 var2 = 3 |
var1 = 2 var2 = 3 |
var1 = 3 var2 = 3 |
So far, the results are rather similar to those where two objects are involved. This is also true of what follows, though it is less obvious. To understand how "var1" is represented, six influence arrows are drawn from it to different parts of the diagram. (Symmetrical results are generated using "var2", though these are not given here.)
| OBJECT | Values of var1 for role I | sum | count | values of var1 for role II | sum | count |
|
Instance 1 |
{1 1 1} |
3 | 3 |
{1 2 3} |
6 | 3 |
|
Instance 2 |
{2 2 2} |
6 | 3 |
{1 2 3} |
6 | 3 |
|
Instance 3 |
{3 3 3} |
9 | 3 |
{1 2 3} |
6 | 3 |
The  condition symbol can be used inside "Association" to permit fewer instances than the square of the number of instances of "Object" to be generated, and thus pass values between base instances selectively.
Inside the association submodel, the index(x) function returns the index of each of the members of the pair of instances that generate this instance of "Association" with x = 1 for "Dimension 1 of Object (3) in Role II for Association" and x = 2 for "Dimension 1 of Object (3) in Role I for Association". To identify which index refers to the use of which role arrow, see the indices panel on the Parameters tab of the equation dialogue box.
Note that the "(3)" is the size of the given dimension. Influences from other elements can also be used in the Boolean expression for the condition symbol.
In : Contents >> Model diagram elements >> Role arrows