Working with submodels : Submodel properties dialogue
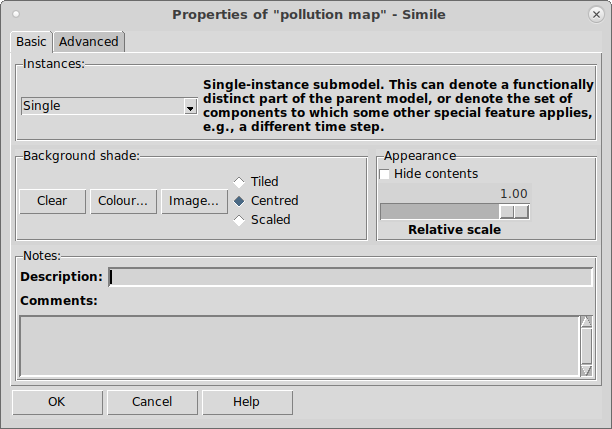
Submodel properties dialogue
The submodel properties window enables you to set the properties of a particular submodel. To invoke the dialogue box, either:
- double-click in any blank area of the submodel, or
- select the "Properties..." item in the context menu for the submodel.
The properties dialogue has two tabs, "Basic" for those most commonly used, and "Advanced" for those that are needed less often.
Basic properties
Control of number of instances
The most important property of a submodel is that it can exist in a number of different instances. Each instance follows the same logic in its calculations, but can differ in the values of its attributes. There are three mechanisms for controlling the number of instances of each submodel.
- Using specified dimensions (default)
This radio button enables you to specify that the submodel has fixed dimensions. By default, each new submodel exists only in a single instance. The dimensions can be set to be any vector or higher-order array. For example, entering 10 in the edit box, creates a vector of 10 instances of the submodel. Entering "10,10" in the edit box, creates an two-dimensional array of 100 instances of the submodel.
- Using number of data records in file
This radio button allows the number of instances of a submodel to be controlled by the number of data records in the file. The submodel must contain one or more fixed parameters, (i.e. a variable whose values are read in from a data file). The values for the fixed parameters are set in the normal way, and the number of records determines the number of instances created.
- Using population symbols
This radio button enables you to specify that the submodel is a population submodel. In this case, control of the number of instances is performed using the population symbols:
 creation,
  reproduction,
  immigration and
  extermination.
Instead of the radio buttons, Simile v6.1 includes a pulldown menu of six submodel types. When a selection is made, a message explaining the type is shown, together with entry fields for additional information required for that type. Simple (dimensionless) submodels are now separate from those with array dimensions, and there are two predefined special-purpose types: rectangular and hexagonal grid.
Background shade and/or image
These three buttons are used to specify the nature of the background colour for the submodel. The "Clear background" button specifies that the submodel is actually transparent: it will take on the colour of the enclosing submodel (or the main desktop window). (i.e. it should be read as "the background is clear", rather than the instruction "Clear the background").
The "Background shade" button calls up a standard colour selection dialogue window. Use this to select the colour of the submodel's background. This is highly recommended: having coloured submodels greatly enhances the effectiveness of the model diagram in communicating the structure of the model to other people.
The "Image…" button calls up a standard file selection dialogue window. Use this to select an image file (in either gif or jpeg formats) for the background of the submodel. There are three modes for image display:
- Tiled: If the submodel is larger than the image, the image will be repeated (tiled) across the area of the submodel; if the submodel is smaller than the image, the bottom and right of the image will be cropped to fit.
- Centred: The image will be displayed at the centre of the submodel. If the image is larger than the submodel box, only the centre of the image will be displayed. Note that a centred image will not be displayed in the background of windows showing only that submodel, because it might look confusing.
- Scaled: the image will be stretched or shrunk along each axis to fit the submodel exactly.
If a background shade as well as an image is specified, the background shade will be visible through transparent parts of the image, and also around a centred image if it is smaller than the submodel.
Appearance
- Hide contents
This suppresses the display of all model elements inside the submodel. You can do this for neatness of the diagram, so that some person looking at a complex model is spared the detail of a nested submodel. However, it is also useful if you are working with a complex model diagram, since a number of screen operations (such as deleting a model element) become quite slow with a complex model when all model elements are displayed.
- Relative scale
This changes the size of the model diagram elements in this submodel relative to those in its parent.
Description and comments
The Description and Comments boxes enable you to type in free-form comments about the submodel. Use this to document the date of creation, author, main features, etc.
Advanced properties
Calculation
The following options can be selected:
- Use units in math
This selects how physical units and dimensions are handled when checking equations in this submodel. The two mechanisms for handling units are described here. Selecting 'No' means only the first mechanism is used. 'Yes' enables both mechanisms. 'Default' uses the same setting as the submodel's parent model, or first mechanism only for the top-level model.
- Time step index
This enables you to specify on which time step the submodel is updated. In most models, there is only one time step (the "Time step #1" value in the Run Control window), which applies to all submodels. In that case, you do not need to do anything here. However, in certain circumstances, it is useful to be able to change this. See time step index for information on these cases.
The following options are alternatives to 'Build from components' which indicates that Simile should calculate the values of the submodel's components in the normal manner.
- Use own code
Allows an external procedure to read and set values in the submodel. See Using externally-supplied procedures for details.
- Conect via pipe/socket
Allows the submodel to represent a calculation carried out by another application with which Simile communicates. See Communicating with another application for details.
Enumerated types
Enumerated types are created using this dialogue box. Enumerated types are lists of names that can be chosen amongst when setting the value of a variable of that type. Please see the help page for more information on enumerated types and on how to create them.
In: Contents >> Working with submodels