
Main menu
You are here
Working with equations : Equation dialogue window
Equation dialogue window
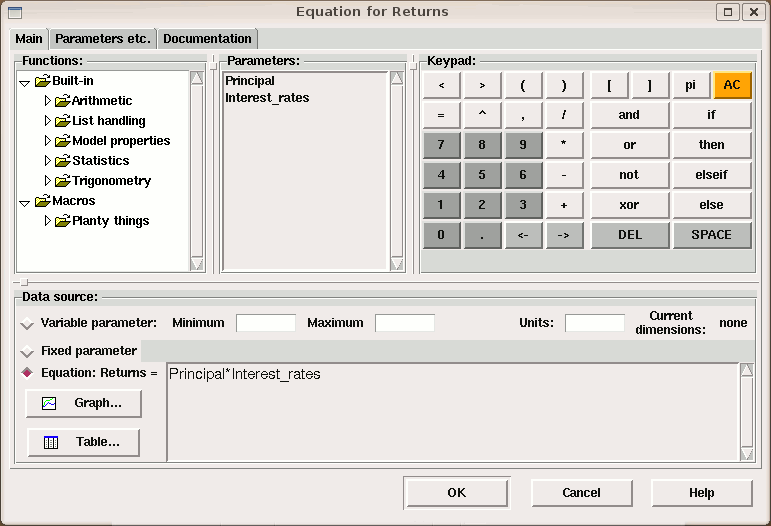
The equation dialogue window is used to identify the data source used to calculate a value for a model element, as well as to set various other properties of the model element. The same dialogue window is used for all the node-type elements, e.g.,  compartments,
 flows and
 variables, as well as the control symbols
  iterations and
  conditions, and the population symbols. For the
  state symbol, the dialogue appears a little differently because an equation must be entered for each trigger event that influences the state. (Note that three other model elements,
 submodels,
  influence arrows, and
 role arrows each have their own dialogue box).
To open the equation dialogue window:
- Select the pointer tool
- Doubleclick on the component whose equation you wish to edit.
Alternatively:
- Right-click on the component to be edited
- Select 'Properties...' from the context menu.
The equation dialogue window consists of a notebook with three tabs. The first of these, labelled 'Main', is initially topmost, and contains the following panels which help you create the equation for your component:
Functions:
This panel displays a tree diagram containing all Simile's built-in functions, plus any user-defined functions that have been added on your system. They are grouped into categories, and have popups giving a brief description of each function. Doubleclicking on a function name will insert the function into the equation at the cursor position, and leave the cursor between the parentheses ready for argument expressions to be entered there if needed. If you have selected part of the equation text, the function is added with the selected text inside its parentheses.
Parameters:
The parameters in an equation are the values of the components that are linked to its own component by influence arrows. The parameters panel will show all the names associated with the parameters that have been connected. These are usually the same as the names of the components they come from, but may be different to avoid duplication, or in the case where a role arrow is being used to select only certain values from the component.
You can double-click on the parameter names to insert them into your equation, or hover over them to display a popup showing the location of their source and any roles that have been used to select their values. The next tab includes a panel that allows you to change the local names of the parameters.
Keypad:
This panel contains an array of buttons which insert text into whichever entry field has the cursor. They include buttons for moving the cursor back and forth, deleting a character and deleting all the text.
The second to right button on the top row inserts customizable text. By default it is set to µ since this character might otherwise be hard to find (it represents the micro- prefix for units) but you can set it to other characters or strings using the entry under the Edit tab in the Preferences dialogue window. Another useful setting for this might be π, which is interpreted as its trigonometrical value, or e if you are entering a lot of numbers in scientific notation.
Data source:
These three radio buttons set the data source to one of the following options:
-
Variable parameter/Time series event: the value for the model element is set from the equation when the model is built, and can be changed during the simulation. The value can be set using a scenario file, and displayed and set through a user-operated slider control. This option is only relevant if the model element is at the beginning of a chain of influences. It cannot be used to alter the value of a model element that is calculated from the values of other model elements. The minimum and maximum values that the parameter can accept must be entered in the neighbouring text boxes. For a full explanation see the help sections Variable parameters and Time series events, and for a full explanation of working with sliders, see the help section Sliders.
-
Fixed parameter: the value for the model element is set when the model is built and does not change. The value can be set using a scenario file. This option is only relevant if the model element is at the beginning of a chain of influences. It cannot be used to alter the value of a model element that is calculated from the values of other model elements. An equation can be entered, but it is only used for setting the array dimensions of the parameter. i.e., its value is never used. For a full explanation of working with fixed parameters, see the help section on Fixed parameters an for a full explanation of working with scenario files, see the help section Working with external data. Not available for events.
-
Limit event: This option is only available for events. If it is chosen, the equation is not the value of the event but is used to determine when the event occurs, by detecting when its value reaches one of the supplied bounds.
-
Equation: the value for the model element is calculated using the expression given in the text box. The expression is first evaluated when the model is built, and subsequently re-evaluated at each time step. For a full explanation of equations, see the help section Components of an equation. In brief, equations consist of functions operating on the values of the other model elements that influence this one. A list of functions is provided. Double-click on any of the function names to insert it into the equation text box. A list of the indices of the model element is also given. One index is listed for each level of nesting of the submodel(s) containing the model element. Double-click on any of the index names to insert the corresponding index() function into the equation text. Finally, a list of the other model elements (if any) that influence this one is presented. Double-click on any of the model element names to insert the name into the equation text.
Explicitly defined functons:
An equation can include one sketch graph or table function, which can be used exactly like any other function. These require extra data to be supplied, so they are added by clicking on buttons. If you just type graph() or table() into your equation, you will get an error message complaining that no data has been supplied to specify the behaviour of the function.
-
Graph: This button enables the user to sketch a graph for a mathematical relationship. The relationship is sketched in a window opened up by clicking on this button. Having done this, a reference to a function graph() is automatically added to the expression in the Equation box. This function is evaluated at run time by referring to the graph sketched by the model developer. See the help entry for the graph function for more information.
-
Table: This button enables a user to specify a tabulated relationship. The tabulated values are held in a data file, and clicking on this button enables you to browse through your file system for the data file, which can be in a variety of formats, and then choose the particular column of data you require from this file. Having done this, a reference to a function table() is automatically added to the expression in the Equation box. The function is evaluated at run time by doing a table look-up on the values provided. See the help entry for the table function for more information.
The data source panel also contains entry fields for minimum and maximum values and for units. Min/max values have various uses in simulation but do not actually constrain the value of the component. They set the scaling of display tools to fit the likely values that will be taken by the model components. Since the I/O tools have access to these values it would be possible to create an I/O tool that would display a warning if a value goes outside its minimum/maximum range. Minimum and maximum must be entered for variable parameters in order to set the range of values for their slider controls when the model runs. For compartments, the model execution can be set up to produce a message if the compartment's value goes outside the specified minimum or maximum. For limit events, they set the values which the equation must reach to trigger an occurrence.
The units entry field can usually be ignored, because a default units value will be generated from the equation and inserted there automatically. It only needs editing if you want a non-default unit (e.g., a real value for an integer constant) or if you want to specify the physical units of a quantity, such as metres per second.
The panel also shows the current array dimensions of the model element. The dimensions depend on the equation and the dimensions of any parameters, so they are not editable. For instance the result of sum() will have one less dimension than its argument, while the result of makearray() will have one more.
The following panels are to be found on the second tab, "Parameters, etc..."
Indices:
If your component is inside a multiple instance submodel you can use the index(n) function to get the identity of the submodel instance currently being evaluated. However if you are inside many such submodels, multidimensional submodels, or particularly association submodels where you can also use index(n) to get the indices of the current base model instances, it can be confusing working out which nesting level you want. So this panel contains a list of all the available index arguments with popups explaining which index each one gives. Again, doubleclicking them inserts them into the equation text.
Influences
If the component has influence arrows connected to it from other components in the diagram, these will be listed in the Influences panel, along with their units and array dimensions if any. Doubleclicking on an influence's name will insert it into the equation text at the cursor position.
Hover the mouse over the local name of a model element listed in the influences list box to see the full path name of the model element. The local name is automatically composed from the full path name by replacing characters that have other meanings in equations (such as spaces, parentheses and carriage returns) with underscores. If you would prefer to use a different local name to refer to the full path name, the local name can be edited. Click on the name in the list box to edit it. The name you enter will only be used in this equation, which must use this name.
In the case where role arrows are used to select only a certain set of values from a component in another submodel, the default local name will also include the apropriate role arrow's caption. For the case of two role arrows between the same pair of submodels, influences between the submodels will get two local names each, one for the values associated with each role.
The local name will be enclosed in square or curly brackets if it refers to an array or list (see below), with nested brackets for nested sructures. These make the equation more readable, and you must keep them when editing the local name.
The 'units' field can also be edited, to set the units that will be used to convert the physical quantity of the incoming parameter into a number which will be used in the equation. See the section working with physical units for a full explanation of how this field is used.
The 'dimensions' field cannot be edited. This tells you the array dimensions of the value that this parameter supplies. Normally this will be the dimensions of the source component itself multiplied by those of any submodels the influence comes out of, though special rules apply for population symbols (creation and immigration behave as if outside their submodels) and those taking part in roles (normally you get a list, but going backwards along an 'exclusive' role you get a single value).
Documentation
Documentation appears on a separate tab in the dialogue box. You can enter a short title for the component and/or a longer description. For components with complex equations you can also put comments directly into the equation text by enclosing them in /* ... */ symbols.
In: Contents >> Working with equations
- Printer-friendly version
- Log in or register to post comments